MCP Setup
Install AdManage MCP in Claude Code, Codex, Cursor, or Claude.ai with OAuth. Connector keys start read only and can be switched to read and write here. You can connect more than one AdManage account or workspace at the same time by adding a separate named connector for each.
A connector belongs to the AdManage account you were signed in to when you authorized it, and only that account can change its access level. If you authorized with a different account (a personal address or another work login), sign in to AdManage with that account to switch it to read and write. Otherwise remove the connector in your MCP client and add it again while signed in here as this account.
New Claude or MCP connector keys are saved as read only. Read-only connectors can still import creatives into your library. Switch a connector to read and write here when you want tools that change your ads, such as launches, edits, or deletes. Use the setup guide below to connect, and authorize while signed in to AdManage with this same account.
Connect another AdManage account
A connector is tied to the AdManage account and workspace group you were signed in to when you authorized it, and MCP clients allow only one connector per URL. To use a second AdManage account, or a workspace group this one cannot reach, name it below, add the generated URL as a separate connector, and authorize it while signed in to that account. Pinning a workspace is optional: leave it on Any workspaceand your assistant can switch between the workspaces in that group in chat.
https://mcp.admanage.ai/mcpclaude mcp add --transport http admanage https://mcp.admanage.ai/mcpcodex mcp add admanage --url https://mcp.admanage.ai/mcp --oauth-resource https://mcp.admanage.ai/ && codex mcp login admanagecursor --add-mcp '{"name":"admanage","url":"https://mcp.admanage.ai/mcp"}'Setup Guide
Use the one-line command for your local agent, or add the web connector in Claude.ai. The first time you connect, you'll sign in to AdManage to authorize access.
One-line local agent setup
These commands use the remote MCP endpoint and OAuth. Do not create or paste an API key.
claude mcp add --transport http admanage https://mcp.admanage.ai/mcpcodex mcp add admanage --url https://mcp.admanage.ai/mcp --oauth-resource https://mcp.admanage.ai/ && codex mcp login admanagecursor --add-mcp '{"name":"admanage","url":"https://mcp.admanage.ai/mcp"}'Claude.ai web custom connector
Open Connectors
Go to claude.ai → Customize → Connectors.
Add the AdManage connector
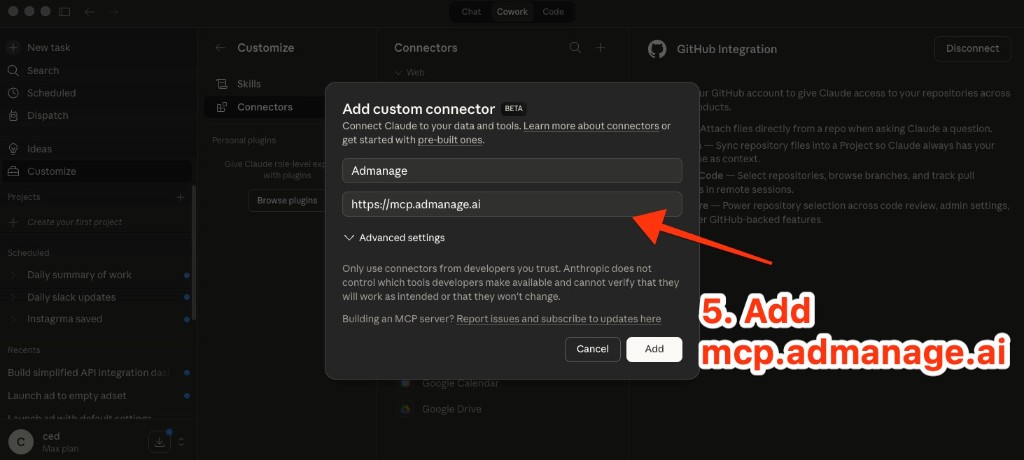
Click Add custom connector (beta). Set Name to Admanage and URL to:
https://mcp.admanage.ai
Use the full URL including https://.
Connect
Click Add, then Connect when prompted. After you authorize AdManage, the connector starts as read only . Claude can inspect your AdManage data and import creatives into your library, but tools that change your ads, such as launches, edits, and deletes, are blocked. To enable those, switch that connector key to read and write in the MCP Access section above without re-authorizing.